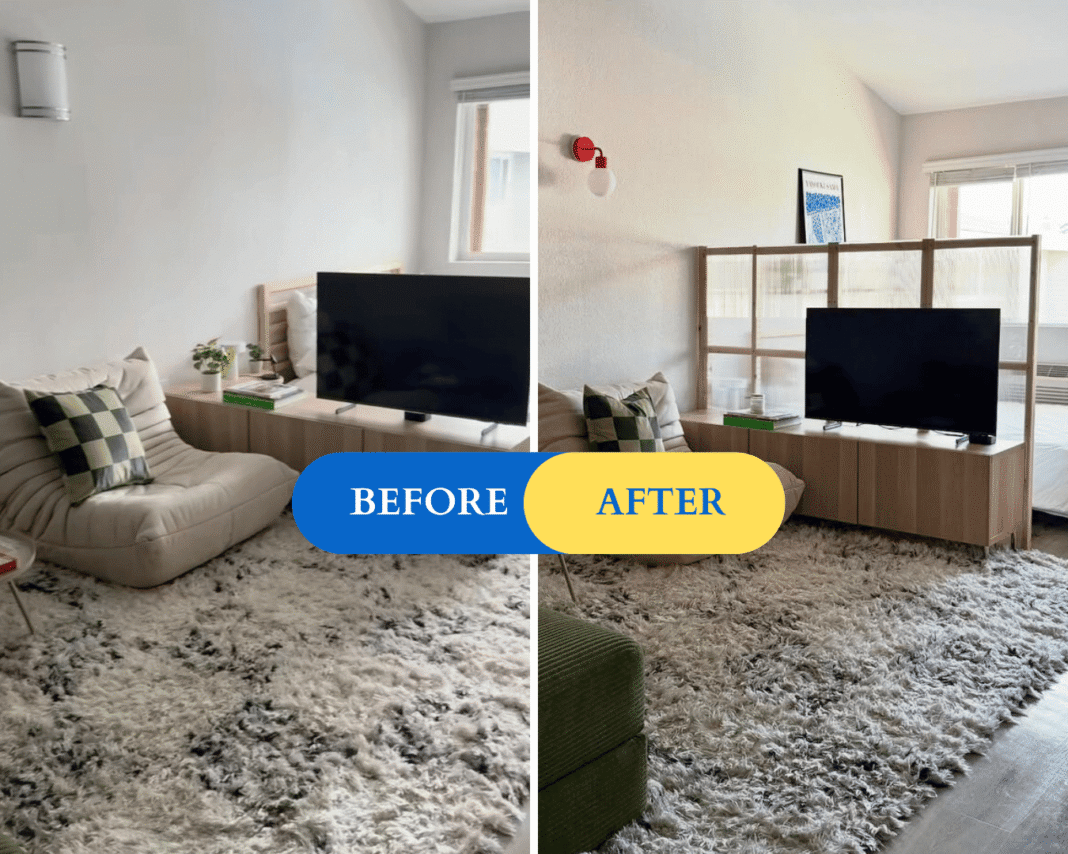
Living in a small house with my husband and son has taught me the art of carving out privacy wherever I can.
At least we have a couple of rooms to retreat to—but I often wonder, how do people in a studio apartment manage?
Imagine trying to nap while someone is watching TV just four feet away. That’s exactly the problem this clever IKEA hack solves.
Cleve @cleve.interior created a quick and easy privacy screen out of IVAR side frames and translucent panels.
Although it doesn’t keep out sound (you can just get some headphones for that), it does offer a feeling of solitude when you want your own space.
The screen is also a great way to define separate zones within a large space, and the translucent panels still allow light to shine through them.
Therefore, you don’t have to worry about the divider blocking windows or darkening the room. Here’s what you need to know to recreate the hack.
What You’ll Need
- IVAR side units (Article numbers: 904.846.54 and 604.846.55) Note: these are the sizes Cleve used, but IKEA has many options
- Polycarbonate panels (48” x 96” x ¼”)
- Wood handsaw
- Plastic handsaw
- Clear Liquid Nails adhesive
- Screws
- Command strips
- Paint
- Basics — screw gun, drill, tape measure, pencil
A DIY Room Divider That Keeps Things Light and Bright
Quick Steps:
- Measure and plan your divider size.
- Cut and assemble IKEA IVAR side frames.
- Cut polycarbonate panels to fit.
- Attach panels with adhesive and screws.
- Add finishing touches like paint or filler.
Step-by-Step: DIY IKEA IVAR Room Divider
1. Figure Out Your Framework
The number of IVAR side units you need depends on what size divider you want to make. The side units come in a variety of sizes, so measure your space and plan accordingly.
Lay out the units and cut them to size to get the final framework of your screen. Screw the frames together.
2. Cut the Polycarbonate Panels to Size
Once you have your IVAR frames cut to size, measure and cut the polycarbonate panels to fit. These panels are almost $100 apiece, so make sure to measure twice; you know the drill.
3. Attach the Panels
Apply the clear adhesive to the frame and put the panels into place. Secure the panels with screws.
Cleve used command strips to attach the divider to a console that serves as the foundation of his room separation. You could use a similar console or a set of low bookshelves, etc.
4. Add Finishing Touches
To create a more seamless look on the side of the divider facing his bedroom area, Cleve painted the frame ivory. This step is optional, depending on what overall look you’re going for.
If you plan to paint, you could use filler to fill in all the screw holes. Then, sand and paint the frame for a more polished look. (Make sure to tape off the panels so you don’t get paint on them.)
Customizing the DIY Room Divider
This room divider hack comes loaded with options.
Want more privacy? If you want more privacy, skip the translucent panels and use something opaque, like thin wood or thick fabric.
Need flexibility? Create a folding screen with IVAR sides and hinges, and then you can move it around as needed.
Cost & Time Estimate
- Materials: $150–$250 (depending on panel type and number of frames)
- Time: 3–5 hours (including painting and drying time)
- Skill level: Beginner to intermediate DIY
See the hack, and follow Cleve @cleve.interior to find more fun DIY projects and clever ways to maximize small spaces.
Have a hack to share? We can’t wait to see it!

