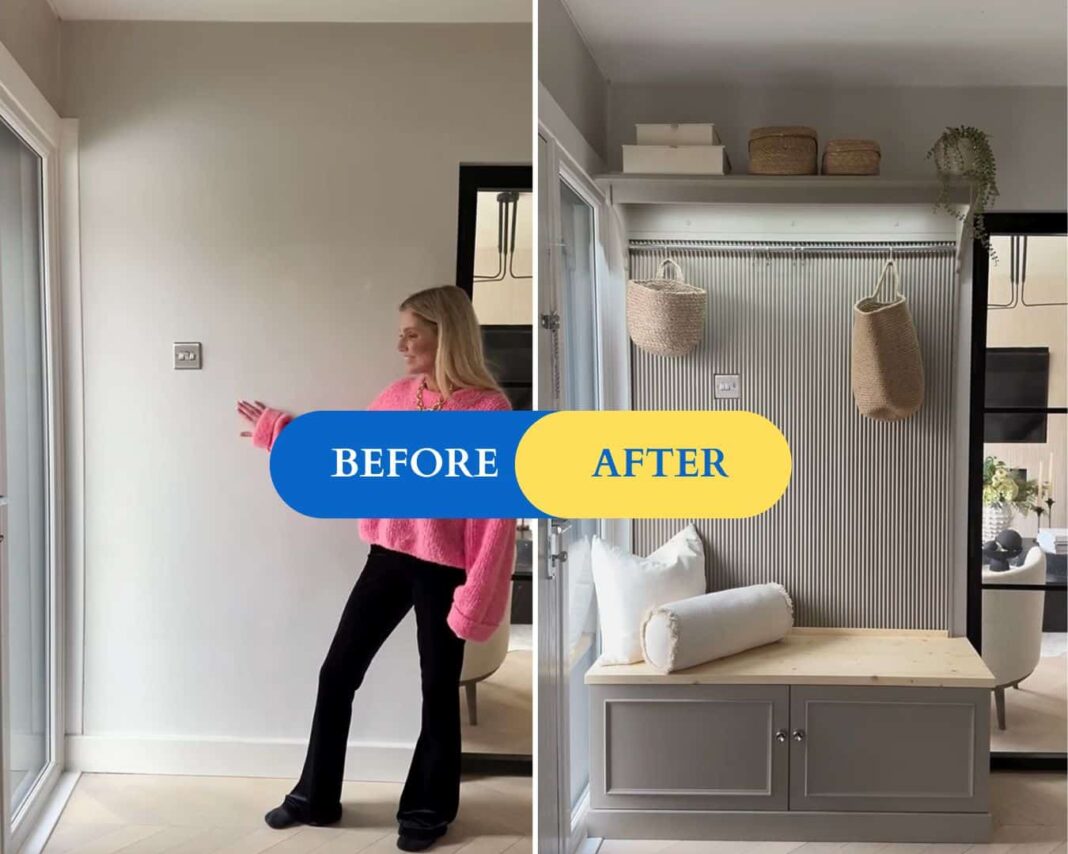
I don’t know about you, but when I come home, I prefer to walk into an organized, tidy space.
And that’s exactly what IKEA hacker Kirsty Gore (@kjg_home) had in mind with her clever hallway bench hack. With just a TORNVIKEN hanging rod and a BESTÅ shelf unit, she transformed her tight entry space into a chic, organized landing zone—complete with storage, seating, and a dash of bespoke charm.
“No more dumping ground!” she says. And we believe her.
Ready to reclaim your entryway?
What You’ll Need
- 1 IKEA TORNVIKEN wall shelf (47 ¼” )
- 1 IKEA BESTÅ shelf unit with doors (47 ¼” x 16 ½” x 15”)
- Decorative paneling
- Pine trim
- Hardwood pine board or worktop (for bench seat)
- Foam and fabric for cushion (optional)
- Handles or knobs
- Multitool
- Miter saw
- Primer
- Paint
- Wax-based wood oil
- Wood glue or similar adhesive
- Caulk
- Sandpaper
- Nail gun
- Rechargeable LED light strips
- Basics – tape measure, screw gun, drill
How To Make This Stylish DIY Hallway Bench
1. Assemble the IKEA Pieces
Put together the BESTÅ shelf unit according to the IKEA instructions and set up the TORNVIKEN. Hang the wall shelf where you plan to position your bench. The placement of the shelf will pretty much dictate the location for the rest of the piece.
2. Cut the Paneling and Bench Top
Measure the area for your paneling and cut the paneling to size. (Kirsty got her paneling from Panels by Sofia.) Mark the location for any cut-outs. Kirsty had a light switch she needed to account for, so she used her multitool to make the cutout. Likewise, measure and cut the top for your bench from the pine worktop.
3. Fit the Pieces
Place, but don’t secure, the paneling and bench seat to make sure everything fits. Position the BESTÅ unit, place the topper, and test out the paneling. Make any adjustments necessary.
4. Sand, Prime, and Paint
Once you’re satisfied with the fit of all your pieces, sand, prime, and paint your paneling, shelf, and BESTÅ shelf. Kirsty recommends the Zinsser Primer with a shellac base for use on IKEA pieces.
She left the pine bench top natural and used wood oil on it, but you could paint this as well, if you prefer. Sand between each coat to avoid lumps and bumps.
5. Put Everything Together
Allow your pieces to dry, then put everything together, securing to the wall with appropriate screws. I would think you could tuck the top of the paneling behind the shelf and the bottom part behind the BESTÅ to hide screws.
6. Make the Trim
Measure and cut the molding to size to trim out around the paneling and to make the door details. Cut the trim with a miter saw. Make the frames for the doors first, then attach them. Paint your trim once it’s in place.
7. Finishing Touches
Kirsty said this was a critical step — filling all the seams and gaps with caulk to get a nice, finished look. Use a paintable caulk so you can match it to your bench once it’s dry. Add your handles of choice to the doors, step back, and admire your skill.
Add LED light strips to the underside of the wall shelf for a recessed lighting effect. Kirsty found rechargeable strips on Amazon (she bought a 24-inch and a 15-inch strip). She also plans to add a cushion to the bench, but the bare wood looks great, too.
High-End Style on a Low Budget
The IKEA pieces come to about $160. After adding up the other supplies and materials, you’d likely spend about $350 to $400, depending on what type of paneling and lights you get. But for a bespoke piece that looks like you ordered it custom, that’s a steal. Plus, an organized, clean, stylish entry? Priceless.
Check out the hack and follow Kirsty @kjg_home for more dreamy design DIYs. Could you use a hallway hack in your home? What’s your biggest headache when it comes to corralling items by the front door? Let us know in the comments.
Got an IKEA hack that you can’t wait to show off? Send it our way and you could be our next featured hack.

