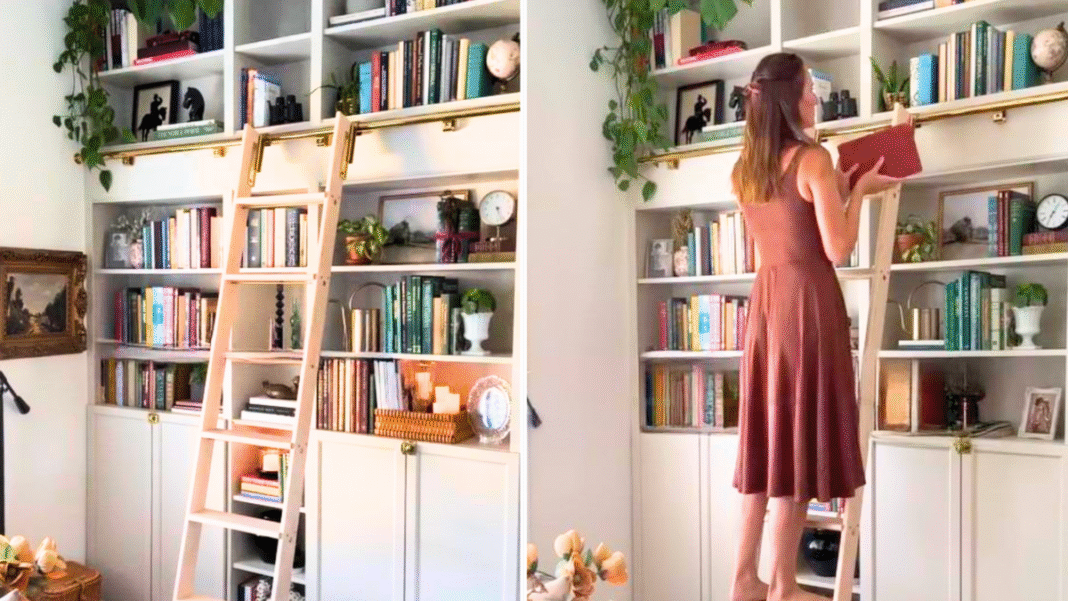
I’m not going to lie, I want this hack in my house so bad, I’m trying to decide where I can squeeze in a mini library so I can have it.
We have a converted shed in the backyard — I wonder. Okay, enough about my hopes and dreams, let’s look at this amazing sliding ladder bookcase hack from Christi Reeves @reevesredesign.
This IKEA DIY features the ever popular BILLY bookcases. Personally, I love to read, so I’ve always fantasized about having a library, complete with rolling ladder, in my home.
But if you’re not into books, think about the game changer this could be in your garage, walk-in pantry, and anywhere else with high places. Just climb up and swoosh to the side, easy peasy.
Making this amazing feature might not be as easy as a climb and swoosh, but Christi’s breakdown makes it seem pretty straightforward. If you have some basic DIY skills (or know someone who does), this could be the next wow factor in your home.
What You’ll Need
- 2 wide IKEA BILLY bookcases
- 1 narrow IKEA BILLY bookcase
- 4 wide IKEA BILLY extension units
- 2 narrow IKEA BILLY extension units
- 4 IKEA OXBERG doors
- 2 x 4s for base (Christi used Douglas fir 2 x 4s)
- 2 x 8s for the header (also Douglas fir)
- Beadboard wallpaper
- PVC 1.5” lattice trim
- PVC ½” bead trim
- ¼” poplar sanded plywood (to cover the front of the header)
- 1 MDF 8’0 Crown Molding
- 220 grit sandpaper
- Paint and primer
- Stud finder
- Finish nailer
- Basics — drill, screw gun, appropriate hardware, measuring tape, saw
- Ladder and rolling hardware
How to Make Everyone Jealous With Your Sliding Ladder Bookcase Hack
1. Build the Base
Construct the frame for the base out of the 2 x 4s and secure it to the wall studs. Use the bottom of the BILLY bookcases to determine the dimensions. The base should be slightly deeper than the bookcases, so the bookcases sit on top.
2. Assemble all the BILLYS
Put together the two wide BILLY bookcases and one narrow BILLY shelf according to IKEA instructions. Position the bookcases on top of the base with the narrow BILLY in the middle. Screw the bookcases into the base and wall studs.
3. Position the Header
Build the header to the proper dimensions to fit atop the BILLY bookcases. Include a plywood piece on top for a solid base for the extensions. Fit the header into place and secure it to the tops of the bookcases and the wall studs.
4. Add Extensions
Assemble the four wide BILLY extension units and two narrow BILLY extension units. Place them on top of the header and secure with screws into the wall studs and header.
5. Apply the Wallpaper
Add the beadboard wallpaper (Christi got hers from @betterhomesandgardens) to the back walls of all the bookcases and extensions. (You can skip the parts where you plan to put doors if you want to save some time and money.)
The beadboard gives the shelves a timeless, polished look, but you could substitute any type of pattern you want, depending on your style. If you plan to paint everything to match, like Christi did, make sure to get paintable wallpaper.
NOTE: Christi offers a word of warning about the wallpaper. She attempted to apply it before assembling the bookcases. However, she realized the shelves have notches to slide the backerboard into place. The wallpaper added thickness, making it difficult, and ultimately, the wallpaper ripped. So, make sure to apply the wallpaper after assembling and standing up your bookcases.
6. Time for the Doors
Add the OXBERG doors to the bottom half of the BILLY bookcases to provide some closed storage. If you prefer less open space, you can opt for taller doors.
7. Trim, Paint, and Style
Cut and add trim around the edges, bottom, and top of the bookcases to give it a finished look. Make sure to use the smoothest side of the plywood to cover the header. Scuff up the surfaces with a 220-grit sandpaper (including the shelves) and prime and paint. After everything is dry, add the shelves and style to your heart’s content.
8. The Star of the Show
The finishing touch is the star of this hack, the rolling library ladder. Christi chose a simple, sleek wooden ladder and fitted it with polished brass rolling hardware from @putnamladders. The rail for the ladder attaches to the header (which is another reason it’s super important to secure it into the wall studs).
Why a Sliding Ladder Library?
Why not? But seriously, Christi said, “I’ve always dreamed of having a home library, but in a 1750 sq ft. home, while raising 3 girls, all of our rooms were already being utilized. This is my proudest DIY. It’s one of the first things you see when you walk into our home, and because we utilized the height of our 12-foot wall, it feels so grand and gives so much more function to this space.”

We say, job well done! What do you think? Check out the hack and follow Christi at @reevesredesign. She also goes into more detail under her highlights (Library Wall). You can also check out some more BILLY bookcase library ladder hacks, or why not put your whole library on wheels?
Got an IKEA hack that you can’t wait to show off? Send it our way, and you could be our next featured IKEA hacker.

