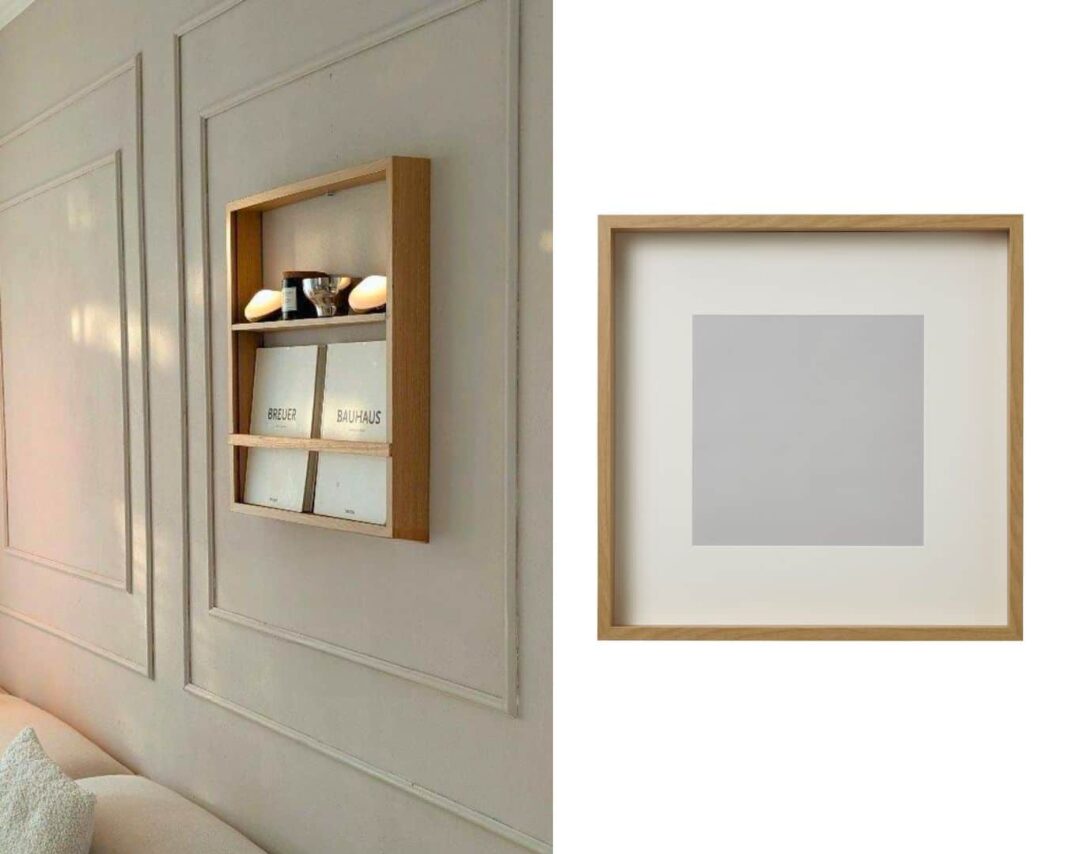
Yes! It’s another super simple, but really cool-looking, DIY. I love projects like this because they don’t take a whole bunch of time, money, or specialized tools, but they turn out looking like something you picked up in a posh home store. We’re going to highlight a hack from Erika Stübing (@herzenstimme), who crafts a luxe wall rack and magazine holder from a popular IKEA favorite.
The DIY garnered over 24,000 likes on Instagram, but wait, there’s more. Spoiler alert: if you’re thinking the creator could have just bought a magazine rack for the same price as the $20 IKEA SANNAHED picture frame, you’re not alone. Several commenters expressed this same thought, and the hacker was quick to reply, “You can’t find this on Amazon.”
I have to agree. I scoped out Amazon, and most of the wall-mounted racks are either pricier or less aesthetically appealing. So you’re either going to spend more or end up with something a bit basic. This hack gives you a custom look, plus combines a magazine holder with a sleek display shelf. As for the price, I’ll delve a little more into that later. For now, here’s how Erika did it.
What You’ll Need
- 1 IKEA SANNAHED picture frame (19 ¾” x 19 ¾”)
- Wood glue
- Tape Measure
- Pencil
- Wooden craft boards, sticks
- Oak wood stain
- Brush
- Clean rag
Reimagining the SANNAHED Picture Frame As a Wall Rack
1. Take Apart the SANNAHED Frame
Remove all of the pieces of the SANNAHED picture frame so you’re left with the simple, square frame. You don’t need the other pieces for this project.
2. Cut and Stain the Extra Wood
Measure and cut small pieces of timber to size for the shelf and magazine holder. You can pick up timber of the appropriate width and thickness at a local hardware store. For the magazine rod, you could also use a wooden craft stick with the desired thickness.
Use a brush to apply the stain, then wipe off the excess with a clean rag. Erika used this oak stain, but you could check out your local home improvement shop. (Bring the picture frame with you to find a close match.)
3. Attach the Shelf and Magazine Bar
Allow the stain to dry, then use a heavy-duty wood glue or similar adhesive to attach the wood pieces to the frame. Let dry for the recommended time before attempting to hang the shelf or place anything on the wood.
4. Hang Your New Shelf
Once everything is dry and sturdy, hang your new, snazzy shelf wherever you want. Style with your favorite magazines and decor. The hacker also mentions that it would be a great display shelf in a kid’s room for things like “little books and small wooden figures.”
Someone else asked about using it in the kitchen to display cutting boards and plates. If you decided to do that, I would definitely make sure the shelf could support heavier items. Therefore, it might change how you attach the wood pieces.
Isn’t It Cheaper to Just Buy a Magazine Rack?
Okay, so as a few different commenters wondered — how is buying a photo frame cheaper than getting a shelf that’s already made or purchasing materials to make it from scratch? I definitely see this point of view, but I also think it depends on what final look you’re going for.
Overall, this project would likely cost you about $25 to $30. (Potentially less if you have wood or stain left over from other projects.)
As I mentioned earlier, I searched Amazon and didn’t find anything quite like this, much less for under $30. The racks were either really basic or more expensive. As for making it from scratch, the SANNAHED frame keeps the process super simple, making it a great project for someone wanting a quick, easy hack.
At the end of the day, you have to decide if it’s worth it for you. If you love the idea of having something a little different and being able to have bragging rights (“I made that!”), go for it.
Personally, I love the finished design, especially the open back. It keeps the whole thing airy and sleek. I think it has a sophisticated look that makes it feel right at home in a stylish living room.
What do you think? Will you give this hack a try? See how it’s done, and follow Erika (@herzenstimme) for more fun upcycling ideas, DIYs, and hacks. Plus, check out this other SANNAHED display shelf to show off your favorite collectibles and keep them dust-free.
If you have an IKEA hack of your own, share it with us and you may be featured next.

